I’m excited, and I think this is the right place to write about it! As part of DIY Publishing Ltd we do websites primarily for authors.
My business partner, Kris, is a designer, and I’m the techie who has to make her designs a reality – well apart from the really crazy stuff which I just tell her to change! Over the years I’ve been using the same theme since it was called Catalyst – and is now Dynamik for Genesis. It’s a great theme, and incredibly flexible.
But it’s not the best if you want the super fancy graphic-heavy designs that today’s websites apparently must be. So I started investigating page builders – and discovered a plugin called Beaver Builder.
Websites for Authors and Politicians!
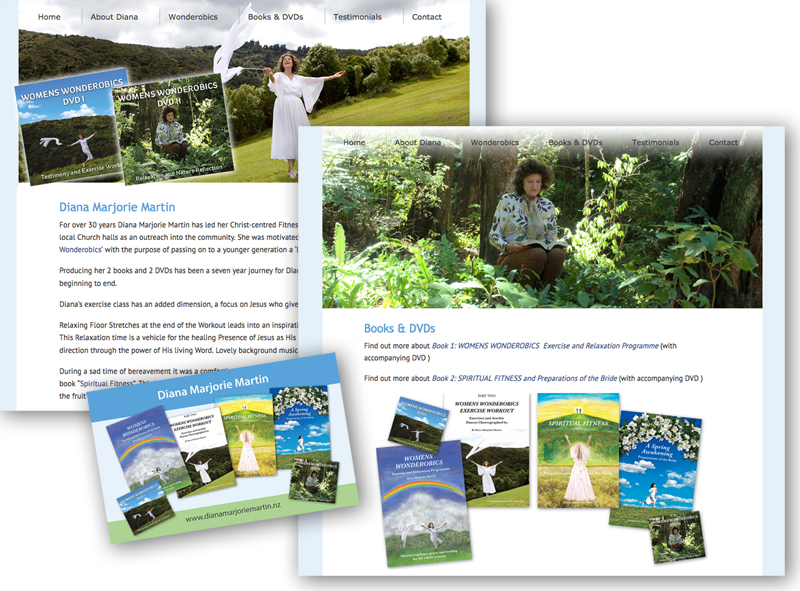
It’s early days – but I’m liking it a lot so far. I’ll be writing more about it more as I discover some more tricks and tips. To date here are a couple of websites we’ve done for clients: http://tinanixonformasterton.nz/ http://dianamarjoriemartin.nz/
The thing with page builders is that they are a direct challenge to websites such as Weebly and Squarespace. These sites are very “pretty” and offer beginners the opportunity to design their own website using drag and drop. That’s the promise. The downside though is that you are tied down to their technology. You can’t expand beyond a website or blog – to say include product sales or event planning – without either paying them more money per a month for their ecommerce option, or finding that you’ve outgrown their platform.
I still love WordPress – because whatever you want it to be – there will be an extension, plugin or theme which will do it. But frankly some days – when trying to get a full-width image to scroll without mucking up the right-aligned top-menu, does my head in.
So enter Beaver Builder. It’s a page builder which allows you to do drag and drop . So far I’ve had a learning curve, but I’m liking the plugin more and more. It has a very active engaged community some of home are building extensions for it. It’s very new, only 6 months or so, but so far I’m happy to keep using and watching this space.
The original title of this site, when it was on blogger, was building an online income one website at a time. I figured I’d need about 100 websites. I’ve hung onto the niche website model for longer than most. I may well go back to it. But at the moment I feel like I’m swimming against the tide too much, and I’ve decided to build an authority site – just to see what happens – oh and to make lots and lots of money (of course)!
I’ve already have one authority site – this one – but I built it my accident, I want to build this one deliberately. As Regev asked a question in my last Catalyst Theme Review I thought it was time to add a bit to that earlier review – by describing how I used the theme’s flexibility allowed me to achieve what I want to do now, and how I can evolve the site to what I want in the future, without a complete re-design.
The Two Main Types of Travel Readers
In my view, there are basically two types of people who read travel articles, be they blog posts or magazines:
armchair travellers, those reading about a places that they will probably never visit (or not in the next year or two). In the blogging sphere these are people skivvying off work, trying to keep the dream alive, or just escaping;
those that are actually actively fact gathering for travelling. They may still be at a high level planning stage (how much money does 6 months in Thailand cost?), or they are getting quite a lot closer to departure (budget hotel near airport. Bangkok).
Most published guidebooks cater for both. In fact the DK Eye Witness Travel Guides (some of the most beautiful guidebooks IMHO) – are pretty much designed for armchair travellers, unless you are using a porter they are far too heavy to actually travel with! Most travel addicts have at least one guidebook to a county they never quite got to!
Most blogs only cater for just one of these groups – often un-intentionally.
First there are those who are either gifted writers or just excited about documenting their trip know little about SEO, end up writing blogs which are great reads, but not very practically focussed. Unfortunately most of these probably never find an audience because the writers have no idea how to promote their work. Writing and they will come still isn’t a great strategy as far as I am concerned, but if you are not writing keyword focussed content your odds of succeeding are minuscule. To get this to work you need to be doing a lot of social media promotion.
On the other hand there is also a number of travel blogs which were setup as, or evolved to, being mainly about practical fact gathering, often very focussed on SEO. Some are quite fun, but then they go on a sponsored trip to “insert country you have no interest in here”, and you lose interest because its all about XYZ for months on end. Some of these sites also rely heavily on social media, but some too use a lot of SEO.
What A Travel Site Needs To Have IMHO
No surprise where I’m going here – I wanted a site which allowed me to reach both the “armchair travellers” with a range of amusing stories, and photos, and maybe even videos, which would get them interested in visiting a country. Plus I wanted to use my knowledge of SEO and some specific travel destinations to write practical, “how to” style articles. I could see no reason why I couldn’t do both. But I did need to think about how to design a site so I could regularly update both a “travel blog” plus specific focussed “how to content”. The how to content needed to be easily found, without being in the face of the casual reader.
I wanted to be able to feature photos. To me a travel blog without photos, is missing out on, a lot. You just gotta have the photos in my opinion. If nothing else it gives some credibility to what you are talking about. I also wanted maps. Maybe I’m just a map geek – but I like to look at maps and I use maps for travel planning.
I wanted clear menus and categorisation, so that visitors could find things easily.
I wanted flexiblity to focus some categories as a silo – offering specific advertising and offers which only relates to those particular pages. Why would an advertiser of Thailand Vacations want to advertise on an article about Canada? I wanted it easy to do this. In fact the more I looked into it the more I could see that category and tag pages are greatly under-utilised resources in many blogs.
Using Catalyst To Design A Hybrid Travel Site
Basic Design Choices
I decided to use posts for almost everything except for genuinely static pages (Privacy Policy, About, Contact and similar). Basically that’s because I want almost all my content to go to my RSS feed. I’ve found that content that I’ve added which is neither linked to from the front page OR the main navigation, still gets indexed quickly. The only reason for that is because its in the RSS.
First I designed the categories up front. I needed a specific category for “travel blog” because not all of my posts were going on the travel blog. I grouped a lot of my destination content around fairly standard geographic divisions. Designing categories gave me the main navigation of the site. I do NOT “no index” any part of my site including category and tag pages. Tag pages often rank first, before my post, so I find them useful “bell weather” indicators. Categories I have big plans for – see below.
My tags are not designed up front. I use tags on pages where I’m targetting specific search terms, plus as a way to cross reference photos to be including in the relevant destination searches.
I wanted a clean nice looking site, which wasn’t too cluttered, but not too bare either. I don’t think minimalism works for travel. On the other hand I am no designer so I wanted something that I could just use.
Implementation: I picked the “Greenfields” skin for two reasons 1) I liked it 2) It’s free. The only thing I’ve really changed is that I thought the header was too deep and took up too much space above the fold so I reduced it a bit. I also didn’t implement the slider because I wanted to use more space on the front page featuring various parts of my site (blog, photos, key destinations etc).
I wanted the site to look good on other devices rather than just computers e.g. tablets, smart phones.
Implementation: Latest version of Catalyst allows responsive design (which is what this is called) with a click of the button – lucky as that’s all I know about it !
I wanted to use a static front page (rather than current posts), because I wanted to provide and overall view of a site that was bigger than just being a “travel blog”.
Implementation: Used a static welcome page layout “wide left 2 3 3”. The header image is actually a top widget, so I can remove on certain parts of the site if I wish to, and similarly the bottom gray footer is also a widget area which can be dropped from parts of the site if required.
Specific Page Types and Layouts
Catalyst provides a specific blog template. Create a blank page – give it that template, add a specific page layout – voila – a “blog page”
Implementation: Under core options you can chose which categories of post show on your “blog page”.
Page layouts is where the power of Catalyst really shines. Basically any page or post can have any layout and any layout can have widgets and other content anywhere on the page. It gets confusing – so briefly here are some examples. The blog page above is using my standard layout with standard excerpts and a sidebar.
Implementation: Each layout is setup first with specific widgets on that page. You then populate those widgets with the code you require. I use a limited amount of CSS in order to float widgets within content e.g. to display Adsense with Catalyst. I also use CSS to suppress metadata on my evergreen content (Catalyst will let me turn it off or on for all posts – but I only wanted to show dates on some content).
Other variations of page layouts I’m using include:
Standard advertising using widgets on most pages – see any blog post.
Full-width layout on some pages where I want to focus on the content: Packing List Book
A different full-width layout for travel photos.
Specific Thailand Category Page – I’ll use a similar design for other destinations in the future.
Specific Category Pages
With Catalyst you can specify a particular page to display for each category. I’m using this feature to allow me to add value to my category pages, by mapping posts to a local geographic map at the top of the page, and then using excerpts below. In future I could replace the sidebar with relevant advertising for this region too. This is basically a development of the process of replacing the Post Page Associator plugin I’ve described previously.
This is a continuing series about developing an authority site. The next post will probably be about finding new keywords in your analytics – stay tuned.
I’ve used Post page associator plugin for a while. Its a handy plugin which allowed you to do what it says on the pack; add a list of your posts in a certain category, at the bottom of the page. I used it here for example.
However the developer has been under criticism for included a “please donate” large ad on your main dashboard if you hadn’t paid – in fact I had give a donation – but I was buggered if I was going to donate for EACH blog I used it on – so I found the advertising a little annoying. There was toys tossed in the WordPress forums though, some users found the nag VERY annoying,- and the developer has taken his toys home – or in this case made the plugin paid only (and quite expensive at that).
Free Option: List Category Posts Plugin
You’ll find this plugin if you search on the install plugins page. It works – you add a short code somewhere in a page where you want the listing of posts to occur – and it does. Now there are a bunch of options, but making it look pretty involved php and css and stuff – so I ran screaming…
Paid Option: Using Catalyst Theme As An Alternative to Post Page Associator Plugin
This really was quite simple – no scary TLAs involved!
Create a new page layout – I called mine indienonfiction.
Decide on the layout of said page – I decided it would have a single right sidebar.
Added a new widget to the bottom of the content on the indienonfiction page layout.
Went over to the widgets area – used the Catalyst Excerpts widget to display the 100 posts in the category of non-fiction.
Added some relevant content to the new custom sidebar
Voila – a New Indie Non Fiction page – with all my posts from the Indie Non Fiction category displayed at the bottom.
Of course its not a free option, unless you already own Catalyst Theme, but really I wouldn’t be paying $30 PLUS $9/month for support for a plugin when I can pay once for an entire theme framework for under $1o0.
Yup its all changed around here again! Well not the content just he look and feel (ie if you are reading this via RSS – click thru !). I had hoped that going from Thesis to Frugal would be my last major change. However Eric Hamm -the guy who created Frugal – upgraded the product so much – it now has a new name – Frugal is now Catalyst !
Catalyst actually came out just before I took off for a 2 month overseas trip with a 10″ netbook – netbook are good for lots of things but doing site design is not one of them!
When I got back I had a look at Catalyst and upgraded some of my niche sites with it. I liked it – but it didn’t have Frugal’s easy to install front page – with a wide choice of widgets. So I didn’t upgrade this site. Then back in February Catalyst upgraded to 1.1 – and YES now there are EZI Widgets – which allows a flexible front page – like Frugal’s – but with even more options!
Still I hesitated – this site is a pain – it has a number of different looking posts and pages, I didn’t really want to think about it. Finally though I had to bite the bullet and get on with upgrading from Frugal to Catalyst – why?
They have a discount for new sign ups of 25% (and incentives for affiliates) – so use the code: CATWP25when you sign up HERE – discount good to the 31 March 2011; (And yes I get an increased affiliate percentage in March too…);
I think I can add value to Catalyst and do a series of tutorials here that will help the CSS-incompetent, design-disabled of you – you know people just like me!
I’ve already done a post on Catalyst’s SEO Options and I also what to talk about how to use Catalyst with the Keyword Academy’s Postrunner and also how to use it as a static site rather than a blog.
But I guess I should explain how I adapted the look of the site here. I could have reproduced the look of the old site – but I decided to keep the general layout but change up the details and the look of the site.
From an SEO point of view its important not to make huge overnight changes to the main pages of your sites – or if you do be prepared to accept that your ranking will fluctuate until Google comes to terms with the changes.
How To Make a Catalyst Site Look Like This Site.
Install Catalyst 1.1.1, then install dynamik child theme and activate it.
Go to dynamik options/import/export – and play around with installing some dynamik skins until you find something you like (I think this is fluid blue).
I kept the same top navbar – but used a custom menu which is new in WordPress fairly recently – much easier to manage the order etc than remembering to change priority on individual pages. Set the option Core Options/Navbar
I dropped the header image – instead the header is plain text. The graphic of my sitting on the beach is a no-repeat image in the body background. I played with the header dimensions until they were something that I liked – 930px x 75px
To do the front page and also some of the featured content: I used Ezi Wiidgets and setup a front page with 1/1/3 layout PLUS 2 feature widgets above the content (not showing on the front page but they do on other pages) PLUS a “fat footer” of 4 widgets. Each Widget can be styled separately so I add a custom style to the top of the front page and use Custom CSS to make its background yellow. The middle widget and the bottom three widgets on the front page are all featuring a single page (excerpts in the case o the bottom 3). This is why Catalyst is so easy to get up and running with – widgets are easy to rearrange and the Catalyst specific excerpts widget makes it easy to feature content from a specific page (an improvement on Frugal where you tended to write the content in text widgets which doesn’t have enough spell checking for me.)
Although much of my site has a single right sidebar some major pages I prefer to minimize distractions on so they have no sidebars – for example any of the pages on the top navigation or the 3 along the bottom of the front page. I use Advanced Options to create a custom layout with no sidebar – and then edited each page to use the “nosidebar” layout I’d just created.
I’ve put most of my signup and navigational aids in the fat footer which is throughout the site -maybe its a mistake – no one will ever sign up again – but I prefer that stuff out of the way.
I used 2 Ezi Top Feature widgets to create the two boxes highlighted below the header (again with custom CSS to change the background). These I chose to display on posts but not pages.
I created a custom widget which shows grey at the bottom of my posts to display my TKA advertisement.
Hope this helps for someone who is trying to combining a fairly general blog with some rather specific pages!
From time to time I mention the theme I like de jour – but my most abiding love affair with a theme is Frugal Theme – now replaced with Catalyst Theme – and I like them both! (Well sort of replaced I haven’t got around to doing this site yet – its still in the “not broken – haven’t fixed it yet”) pile. But with the release of Catalyst v1.1 I am pretty darn impressed and even WordPress 3.1 is appearing to be stable enough to upgrade to – so here’s my first Catalyst Theme Tutorial.
So how is Catalyst for SEO – well its pretty good – its flexible, it won’t do it for you – but you can set and forget it. First if you are already using a plugin such as All-In-One-SEO or Platinum SEO – then you can keep on using them, they play happily with Catalyst 1.1. However if you are starting a new site – you can probably skip the plugins and just use Catalyst’s built in SEO.
Once you’ve installed Catalyst and the Dynamik child theme – you will have a Catalyst Sub Menu on your main WordPress menu and under that three options: Core Options, Dynamik Options and Advanced Options.
Go to Core Options and Chose SEO (if you are using a SEO plugin at the top of the page will be a warning telling you that anything you do will be ignore).
Setup Site Wide SEO Options in Catalyst
That’s how I do – it but you have got some options:
Title Tag SEO
Title Tag: – you probably want to append the site description to your title tag – but on the right – (words nearer the left are considered to have more weight in SEO)
If you have a keyword rich site name then you should probably append it on inner pages – if however you have a general brand name then don’t bother.
You only want ONE H1 tag on the front page – your choice whether its title or tagline.
Robots Meta SEO Options
I vary on this but I never check NOINDEX on tags or archives – I find them in the SERPS too often. The author page is irrelevant on a single author blog – so I do check NOINDEX on it and sometimes on Category.
If you want to have comments do-followed you can uncheck this option rather than installing the do-follow option.
I don’t Noarchive anything.
HomePage SEO Options
Generally I use this blank and use the site title (under Settings/General menu)
Homepage metadescription – is helpful friendly, something that may make someone click thru – but has lots of keywords in it too!
Obviously put your keywords in the homepage meta – it probably doesn’t do anything but…
Homepage Robots Meta – all unticked.
Canonical paginated archives sounds like a good idea – to be honest I’m not exactly sure what they are though!
Up to now these options will apply site wide.
In addiition on every page and post in Catalyst you have another bunch of SEO options (under the main editing screen) these include
Catalyst page title
Catalyst description
Catalyst keywords
You can also noindex, nofollow and/or noarchive the post or page.
Unbelievable! I am doing OK with Adsense. And I am not stupid technically, and I’m a woman so I can follow instructions. I have several degrees, and I can connect a TV to a digital box and a DVD player, I can waltz.. But I have never ever been able to integrate my Adsense and Analytics account until today. I have followed the standard instructions, I tried them again, I have changed themes, I have deleted and reinserted code ad nausaeum, I’ve used plugins for WordPress – nothing bloody worked!
If you have never tried to integrate your Google Analytics and Adsense accounts – you will probably get directed – to this page and if you have multiple domains running Adsense and a single Analytics account this is the relevant part of the page:
This scenario is for people who want to track more than one website in their Google Analytics account. For each website, you may have one or more profile assigned to it.
On the ‘Getting Started’ page, you’re prompted to select either ‘Create my free Google Analytics account’ or ‘I already have a Google Analytics account. Please link it to this AdSense account.’ Select the second option. Click ‘Continue.’
At Step 1, select the profiles you want to link to. Click ‘Continue.’
Step 2 asks you to select a primary domain. Designate one of your websites as the primary domain. The primary domain requires no code changes, so if you have a site that’s large, complex, or difficult to update the code for, that would typically be the site you should designate as your primary domain. Profiles for your other non-primary domains will require a modification to the tracking code.
In Step 3, you’ll see that there are no code changes required for your primary domain. For all other non-primary domains, there is an extra code snippet, the AdSense Analytics Code, to add. The AdSense Analytics Code should be added to the top of any non-primary website that contains your AdSense ads.
For many, or even most of you – this will work – but it never had for me – and I know I’m not the only one. As my Adsense income keeps going up I was getting more and more annoyed at not knowing exactly which pages and which keywords were making me money – how hard could this be, how stupid could I be?
Well after yet another thread of frustration over at the TKA forums RJ from Search Engine Whisperer stepped up and said he would help – he logged into my laptop played around – changed my primary domain – and bingo it worked… but only for that domain – still couldn’t get Adsense in any of the other Analytics account.
But he prompted me to look again and I found the answer – buried deep in the support forums. If you can’t get analytics / adsense integration to work – try this: (this would probably be better as a video but I don’t know how to blur bit out of video.
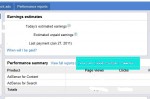
1. Go to your Adsense account and make sure that they “should” be connected ie you have the same user permissions etc – if you are correct in Adsense account you will have a button to click through to Analytics like this:
2. Click through to your Analytics account. On the main screen – the one that lists all your sites – find the site you want Adsense integration on. You will need the UA code later – highlight it and hit ctrl-C to copy it (or write it down if you can read your own writing). Click on the Edit button:
Figure 2
Now you are on the Analytics profile for your site
Figiure 3
Now if you have the problem I had; note how the details say you are NOT receiving Adsense data – that’s the problem. Click on the really tiny edit button in the grey bar just below the check status – yup the one you never noticed before and you will see this:
Figure 4
Yes last paragraph you DO want to receive Adsense data!
If you already had the codes installed on your site – then it will all work now! You probably don’t need that code provided but you MUST click on that box that asks about Adsense and you MUST save changes on this screen!
How to Check if You are Receiving Adsense Data in Analytics
Obviously you will only see Adsense data as its collected – but as soon as you have done the above change correctly – go back into your normal Analytics reports – under Content on the left side menu you will see Adsense $$ !
How to Install the Adsense/Analytics Integration Code in WordPress
1. I’m using Catalyst Theme which like its predecessor Frugal – has a place to add header and footer scripts. Add the code from the last screen above in the header scripts and your standard analytics code in the footer and you should be good to go.
2. Alternatively (and independently of your theme which can be handy) – use a plugin such as Google Analyticator – this is really fast:
go to Plugins/Add New and search for “Analyticator”, install the plugin
go to the Analyticator settings page (from the main plugin page)
click the drop down box to enable the plugin, then use ctrl-V to add the code you selected way back at the top of this tutorial (UA-XXXX-X) into the Google UID setting AND the Adsense ID setting as well – hit save.
Now I know I am not the only one to have had this problem – hopefully this will help some of the rest of you… If you find this useful please promote the post using the anchored text “can’t integrate Adsense and Analytics” or similar! I’ve wasted hours and hours trying to solve this problem so lets help someone else to safe that time!
Ideally – if I wanted a site completely focussed on websites for small business I would do the following:
I would try to get the exact domain name match e.g. websitesforsmallbusiness.com (or net or org) – there is definitely a bias from Google in favour of exact match domains (this does not extend to .info, .ws. .biz .co or any other extension). In this case those domains are unavailable and I wanted to focus the site on a particular country, so I went with the .co.nz extension.
I would include the keywords I was targetting in the blog’s title – sometimes you can’t get, didn’t get, didn’t think before you established a website – so end up with a stupid domain name e.g. lissowerbutts.com – but you can still target a totally different keyword by using the title tag. Ideally though I’d have had an exact match domain name.
Then I’d add the keyword again into my tagline.
I’d head over to the permalink settings and change them from the default for WordPress – which is the ugly ?p21 format and make them %postname% so that now I would have “pretty” urls like http://websitesforsmallbusiness.co.nz/website-package which include the page’s and post’s titles.
If I wasn’t using a theme such as Catalyst which includes SEO options I would install a FREE plugin such as all-in-one-SEO or Platinum SEO. I would tell the SEO options it to NOT noindex categories and tags and other pages.
Using those SEO options I’d add the main keyword into the title and meta-description of my homepage, and it and related keywords in the overall meta tags of the blog. This counts for very little – Yahoo may still use meta tags, Google probably doesn’t. Google may or may not use your meta description in your site’s search engine’s listing.
Now having done all that – I would add some posts and pages – which – obviously – would talk sometimes about websites for business in NZ or websites for small business or even cheap websites for NZ business– all obviously closely related.
If I was feeling really ethusisastic I would add some optimized images. Now Google is pretty stupid – its only a computer and tell that the bunch of pixels at the top of the post are about the consequences of earning a passive income online. So I told it! (Yeah I know its a stretch but I don’t have an image of banknotes lying on the beach!). BTW traffic you get from Google’s image search are notorious for only staying long enough to steal your images, they are useless as readers or revenue sources! To optimize an image do the following:
change the name of the image – before you upload it – include your keyword in the new image’s title – mine is now called https://lissowerbutts.com/wp-content/uploads/2010/07/Perth-From-Rottnest-passive-income-reward1.jpg
then when you import the image – make sure the title, the alt-title, the description and the caption all to include the keyword of interest.
Perth from Rottnest - Passive Income Rewards!
Targeting More Than One Keyword on a Website
All of the above was an example of a small and focussed website. Not all websites are like that – this one sure isn’t it – it ranks quite well for its main keywords passive income online and related terms. But I also rank for terms utterly unrelated to those. How does this happen – well I do two things – I add relevant content. For example I rank quite well for the term postrunner and postrunner review – that’s entirely deliberate. This is what I did – I wrote a post: Postrunner Tutorial – used the keywords and related terms in the title, at the start of the post and at the end. I didn’t try for any particular number of times – I didn’t unecessarily captialise, bold or italicize the term – though it was natural to use it in sub-headings that happen to be bolded…
Then I wrote another post – also about Postrunner – I linked the two together – simply to tell my readers that there was a previous post that they should maybe read first – and to tell the search engines the same thing. I used the same category and similar tags for the two posts. Google now knows that I have quite a lot of i.e. more than one page, about this particular topic – that gives my pages a boost up the rankings,and hopefully a double listing (if I use exactly the same anchor text linking from each post to the other).
Ultimately you can get one website ranking for a bunch of unrelated keywords – and even it you started totally wrong – you can change everything up but adding titles and revising posts and get the same effect in the end. The key though is to get the site ranking for one keyword first – once you have the first ranking it will be quicker and easier to get subsequent rankings.
So over a couple of thousand words that’s pretty much a free on-page SEO guide. Its really not that hard – and almost all of your effort should actually be directed at getting backlinks for your site !
I’ve been running Chris Pearson’s Thesis Theme on this site for a while – last July I installed Thesis. As I talked about in my last post : I am now running Frugal Theme not Thesis.
Why I Chose Thesis in the First Place
I am not a designer I know little CSS far less php, enough html to get by. But I wanted to be able to develop custom websites – not just for my own use but also for SEO clients. Thesis seemed to offer the promise of doing this without coding – their advertising is based around that, At the time I bought Thesis there was no money back guarantee – so I wanted to make sure I got it right. So researched, and then bought Thesis 1.4
I was never impressed with Thesis and although I bought the $87 single use licence intending to upgrade to the multi-site use Developer’s version I never did. Instead I bought Elegantthemes for my other sites and retained Thesis here. I think my relationship with Thesis soured when I had to go their support forums to learn how to install my own header image and change the site’s background colours to match.
The Boxes Thesis Failed on – Is Frugal Any Better?
Originally I decided not to upgrade to the developer’s version of Thesis for the reasons I listed in this September 2009 post about Thesis. I recently updated to Thesis 1.7 and my issues still stand – so I have reproduced my original problems with Thesis and compared Frugal with the same issues. Yup this is genuine review of Thesis 1.7 and Frugal 3.3 from someone who has used and abused both. The Thesis comments below are my original September comments – and then I’ve followed them with my take on how Frugal Theme stacks up.
THESIS: It has not one but two Thesis Options panels – this is confusing – I am always going to the wrong one – even after months. Actually its up to five now plus the Thesis Openhook plugin – which always felt like functionality which should have been in the base Thesis install. But to be fair – this was my first experience with a sophisticated Framework rather than a simple theme – it took some getting used to!
FRUGAL: Frugal installs a 6-option menu which I find quite simple to work my way through. The excellent videos from the developer Eric Hamm describing each and every option are extremely useful.
THESIS: I had to use code to add a header image and to match the background colour. This is the single reason why so many Thesis installs look like a default Thesis install.
FRUGAL: For comparison purposes I’ve included a list of Thesis and Frugal themes sites at the end of this post – just to show what “non-designers” can do with these themes. But the bottom line is that its really easy to add a header and then change the background colours of Frugal – much, much easier than it is with Thesis. If you can do these two things you can make your site look unique!
THESIS: Using images is painful – I have to import an image and then cut and paste and add the thumbnail image code so that I can have the combination of having a picture anywhere I want in the picture plus having the thumbnail appear on other pages such as categories – its a nuisance. (Upgrading to 1.7 made this even more painful as I had to scroll a LONG way below the post past all the useless javascript libraries to get to the thumbnail options.
FRUGAL: Thanks to Thesis 1.7 ignoring the functionality of WordPress 2.9 native’s support of thumbnails I’ve had to go thru my past posts and nominate an image as a thumbnail – but going forward – images are very straightforward – import the image into the post – nominate as a thumbnail – job done!
THESIS: Thesis is expensive if you want to deploy it. If you want to run it on more than one site you need that developers editions – that’s another $77 over the initial $87 for a single user. Plus if you want to sell a customised theme to a client that’s another $15 now $40 per a client theme.
FRUGAL: Exactly the same pricing! For one site $87 for a single site or $164 $164 for a developer’s licence plus $40 per a client site. I notice that both themes now have a 30-day money back guarantee – something that Thesis didn’t have when I bought it. Nice to see competition doing its thing. Honestly I think Frugal should be a little more aggressive on their pricing in order to differentiate themselves from Thesis – once they have the market share they can then up the price – but until then – just my opinion though!
THESIS: Thesis makes a big deal of being SEO friendly – but its SEO settings are no more difficult to use than the free all-in-one-seo plugin – it replaces that plugin – but most people would already be running all-in-one anyways.
FRUGAL: Is just as easy to set up for on-page SEO- if not more so (the defaults are much better than the Thesis defaults for SEO). I’ve seen Frugal Theme criticized for its SEO this over and over – there is no issue that I can see Frugal is just fine for SEO (and replaces All-in-one-SEO or Platinum SEO plugins).
THESIS: if you are a designer Thesis really is a framework and you can no doubt do beautiful things -but its a bit like giving me a top-quality blank canvas and a paint brush and tell me go create – I am a rather more paint by numbers gal! You maybe able to do beautiful things with Thesis – or afford someone who can – I can’t do either.
FRUGAL: Frugal is astoundingly easy to to customise for a non-designer. It is dead simple to produce a site which looks like a website not a blog. Its astoundingly easy to customise the look and style of the site. Its everything I hoped Thesis would be when I bought Thesis 1.4 and which Thesis 1.7 has still failed to deliver on
THESIS: The ability to display ads using the “multimedia” box is fine and the ability to control this down to post level is impressive. What’s not is the place you put the code shows at most 2 lines of a narrow column- you have to use a text editor to actually edit and update the code – this is because most of the screen space has been used on the unecessary design elements.
FRUGAL: There is not quite the same concept as the multimedia box in Frugal – but you can do custom layouts for pages and the ability to add custom widgets at almost any point in the design – so I am experimenting with this. I’ve gone away from the standard 125×125 ads in the sidebar anyways – they use up a lot of space and rarely converted. Frugal Theme’s use of and implementation of hooks is brilliant – its a difficult concept but a truly understood it with Frugal – never had with Thesis. The fact that you get dummy text when you hook in widgets to hooks is fantastic for those who are learning this stuff (like me and most of their customers).
THESIS: Their affiliate banners are really. really ugly – yellow is the only option – and this is in the marketplace where people care about design. This may have changed with the outsourcing of their affiliate program – I’m not up to date but Costa at Bloggigs is not very impressed with the new Thesis affiliate program for international affiliates
FRUGAL: In-house affiliate program which pays 40% to affiliates running on the iDevAffiliate platform which I’m seeing more and more often (TKA uses it too). Nice set of pretty banners – like this one 🙂
On Going Thesis Development Issues
Since I raised the issues above in September I have found Thesis continues to annoy. Because I chose to have images in my posts in different places in each post – there is no way that I can create an automatic thumbnail for each post – which is used in the extracts of older posts (a feature I really like with Thesis, but is easier to use with Frugal). Instead, after importing an image to a post, I had to go to the advanced setting of that image and cut and paste it in the thumbnail url below the post – and then edit it to reflect the actual thumbnail name!
The latest version of Thesis – made this worse by adding a whole bunch of JavaScript libraries immediately below my post’s editing area – which I now have to scroll past to get to the image urls and options.
Thesis seems to be loosing the plot with what features are released when. There was an active debate in their forums expecting that Thesis 2.0 would be out in September 2009 – and that it would have such innovations – such as easy point and click to change the header image. Still waiting on that easy header change AND Thesis 2.0 – but Thesis 1.7 has a whole bunch of javascript library options? Sorry but WTF – although its true that customers don’t always know what they want – but wanting to change a header image – thats pretty darn basic! Because if you can’t retain your customers they are going to go elsewhere – and the options are starting to improve – not just Frugal but Headway too.
Which is Best Frugal or Thesis
As my readers know I don’t mind calling a spade a bloody shovel and I think Thesis is slipping behind. The risk is though that its winning the marketing war – the line up of “big” name A-list bloggers really does seem to impress people into the desirability of buying.
I don’t know how much longer that is going to work though – I think Thesis has made three key mistakes:
they haven’t listened to their customers and responded to the customers fairly basic requests (e.g. easy custom headers);
they do now provide a 30 day guarantee so that people aren’t “stuck” with the product that didn’t live up to the hype;
they have pissed off a whole lot of their affiliates – eBay has discovered that pissing off the people who bring you traffic is dumb idea – it looks like Thesis is going the same route.
Frankly Thesis hasn’t kept an eye on the competition. Frugal does everything that Thesis sold itself to me that it would deliver on:
easy to customize without knowing css and php;
easy to upgrade and modify as my site developed ;
easy to deploy for my clients and to maintain for them (or preferably, teach them to maintain).
An in your face design who seems to have upgraded from Thesis to Frugal for similar reasons as I Enemy of Debt
Zen Habits – no introduction required I think. There is a free skin available from Frugal based on Leo’s blog’s design (with his permission).
Thesis Example Sites
Most of the Thesis sites I found using a “powered by Thesis” search – found me SEO ‘s sites – Thesis is loved by the SEO and design community because of its promotion by the “A-listers” and its opportunities for consulting by writing e-books on how to use Thesis and custom designs for those who give up on the books.
Friction Marketer again a basic Thesis look – well worth reading the article linked to from the point of view of Brian Clark’s social media skills. (BTW that was September 2009 Brian is talking about the release of Thesis 2.0 – it hasn’t happened yet).
R James Horne – the classic “Thesis look” – sorry James !
Even More classic Thesis (sorry Steve!) Social Media
These are more sophisticated Thesis “looks” – but would have taken quite a bit of custom code to achieve:
Sorry – the post is a bit long even for me! But I really found it an interesting comparing Thesis and Frugal – one should have the first mover advantage (Thesis), both obviously have extremely talented developers – but one (Thesis) has outsourced their marketing to the A-listers, the other (Frugal) is going it alone and trying to build a good affiliate network. Frankly one of the reasons I took so much time on this post (and it took days) was that I have seen very few in-depth reviews of Frugal – and came across some downright misleading stuff (like the so-called lack of SEO). This is my attempt to fix that (oh and get a bit of affiliate income too!)
Update April 2011 – I have updated the theme again – Frugal became Catalyst – which is a really, really turbo charged version of Frugal -which I got a free upgrade to as an existing customer. To read more about Catalyst check out my Catalyst review
Hi all – if you click thru and get your yourself onto the actual site – you will see some stuff has changed around here! I am still getting the edges smoothed off but Passive Income Online has had a spring clean and is now running the Frugal Theme by Eric Hamm.
I have a (very) long post coming out in the next few days describing why I decided to move away from Thesis ( a theme I’d already paid for) and install Thesis Frugal – this is the short version in case anyone happened to notice (or care) about what happened around here.
In case you have already forgotten: this was this site running Thesis 1.7:
Passive Income running Thesis
After a bit of practice with Frugal (I’ve owned if for a couple of weeks) I took the deep breath and installed it here. Out of the box – i.e. just after I hit activate after uploading the Theme I had a site that looked like this:
Frugal Default Install on Passive Income
It took me a couple of hours – and I had written down the details of the design from the Thesis install. But I now have a site which at least resembles what this blog looked like with Thesis. I’m going to change it more – but I thought I would be too radical to start off with just so people didn’t think they’d wandered into the wrong site!
Frugal Looking Like My Thesis Install
If you want the gory details of how I did the customisationisation without writing a single line of CSS code and very little html. This is the short version.
I made sure that I had the custom header which was kindly given to me by Costa over at Blogigs: WP Easy Customization Tips.
I trawled thru the custom CSS being used in Thesis plus the font and design options and wrote down little details like fonts and sizes and colour codes for the backgrounds, fonts and other shite.
I installed Frugal 3.3
I was impressed that Frugal preserved my existing sidebar arrangement complete with widgets.
I easy fixed my top of page navigation which has been broken since I upgraded to Thesis 1.7.
I had read the Frugal manual and watched Eric’s excellent videos so knew that I could use his custom widget functionality to add my yellow welcome box at the top of the page (I chose to change it so it was full width not just above the content column as in Thesis – it was easy to change by choosing a slightly different hook).
I also used a custom widget to add a the blue box at the bottom of posts promoting The Keyword Academy.
I have to go through each post and add a thumbnail. I wasn’t surprised – Thesis 1.7 was suppressing the WordPress 2.9 functionality of thumbnails so I knew I’d have to go back and fix a pile of posts. The good news is that from now on to add a thumbnail all i have to do is click that option when I import an image – not more cutting and pasting image urls yeah!
So far there are two things that I can’t find a way to reproduce with Frugal:
I quite like the single post followed by excerpts of older posts which Thesis does. Frugal well let me have 3 excerpts below the main post – but I haven’t found a way to do more than three (without code – I’m sure I CAN do it with code but that’s not the point) Confirmed by Eric (the developer and owner of Frugal) that I will need to look at a slightly different layout – given that some of you commented you hadn’t realized I’d changed themes thats cool;
The comments on pages appear to have gone AWOL – not sure how to get them back! Answer go to the “main options” page and select comments on pages and posts options – duh!
What is a keyword – or more specifically what is a long tail keyword phrase – caused me endless confusion when I first began. I totally didn’t get it – that’s why products like Scribe SEO exist – to prey on beginner’s confusion. That’s unacceptable in my view – so here is the information that you need about keywords. Its here for free, you don’t have to sign up for any membership site or even a one off payment.
There are heaps of erudite SEO expert posts on keywords out there – this isn’t one of them. Instead this is an attempt to take it back down to basics – stick with me because I want to start to with a real world business example – and then we will move onto niche sites and blogs.
Keywords For a Service Business
I’m going to tell you how to do it for free. Lets assume you offer house washing services – purely because I am in the market for the same at the moment. Now I may search for “house washing” now this gives me a mixture of results including DIY articles on how to wash my house down and news results for house washing. But I am not interested in learning to wash my house down – I want someone to do it for me! The result is somewhere there in the 7 million pages returned by that first query – but its too hard to find. Instead I try again and type “house washing service” now I have the right sort of result – but they are in Michigan and Atlanta – its (now) obvious I want a local service – so I try “house washing service Wellington”.
So pretty much your keywords are all terms that should appear on your business card; what services you provide and the geographic locality that you service. Most businesses will have a number of keywords. House washing dude may end up with a list that looks like this:
house washing Wellington
house washing northern suburbs Wellington
water blasting Wellington
window washing Wellington
quick quote house washing Wellington
guaranteed house washing Wellington
So basically the keywords for a service business include each service you provide (house washing, water blasting), the location you services (Wellington, northern suburbs) and your unique selling points (guaranteed, quick quote). And all of these are in the language that your customers will use to find you – not the industry terms common among the experts!
Keywords for a Consultancy Business
One of the things I learned in my brief tenure over at Third Tribe Marketing was that an awful lot of people start with the thought that they are going to use the Internet as way to drum up services as a consultant. Common trades seem to include:
Social Media Consulting
WordPress Blogging Tips and Tricks
Marketing Strategies
freelance writing
This is a little trickier – basically because its harder to define a consultancy business – a plumber has regulations about not doing building or electrical work, possibly unfortunately, white collar consultants do not. From a business point of view you really, really should define your services very clearly. If you are planning on providing “web services” to the world and can’t define it any further – your problem is not keyword identification – its a business plan!
Next you should be aware that not all keywords are possible to rank for easily. Some have more competition than others. In broad terms the longer the phrase the more likely you will get to rank for it fairly easily and the more likely you will get a paying customer. For example which of the following phrases typed into a search engine by a potential customer do you think may convert to an actual customer? Lets assume you are selling writing services
freelance writing
web freelance writer
freelance writer for hire
freelance writer for hire cost less than $500
freelance writer to write about home improvements
Now before some freelance writers jump on me and say some of those terms are not grammatically 100% – I say that’s the point – people tend to type into Google as they think – they don’t edit for perfect grammatical structure. Useful keywords are ones that reflect how people search – not the text book!
Now those last couple of phrases will show in the Google Adwords tool as having no searchers – that’s an approximation. The same tool tells me there is no searches for people looking for family home for sale in Khandallah but there is at least one – I have shown her the house… At that’s the point I need exactly one person to buy the house, if you are freelance writer a client a week or even a month could be the start of a profitable career – you don’t need a thousand new clients a month to launch a freelance writing career – so find very long tail keywords that relate to the services you can offer and use them for post titles – it really is that simple.
So Which Longtail Keywords Should I Use on My Blog?
Many people start off in the general – this is my life or my work or my passion blog. These seem to particularly struggle with adding keywords to their posts – because its an after thought. Often they have bought into posting an excessive number of times a week – i.e. more than the once I manage around here. They’ve been told they have to post all the time – guys YOU DO NOT! Some of my favourite bloggers post once every few months – but when they do post its a useful, worthwhile and generally long post – it usually then has another few thousand words added in the comments – if you are good enough people won’t forget you! I’m not that good – but I can go weeks without posting anything here – and it rarely drops my subscriber count, doesn’t hugely effect my traffic, and makes little to no difference to the income I earn from this site.
Oh and you can ignore a site for months and suddenly start posting again to – I just did with a site of mine – posted for the first time in 4 months- indexed within 24 hours!
Why? Because most of the people who buy from me come from search traffic – often they will stick around, clearly dazzled by my deathless prose, but I measure success by income not subscribers (blame it on my bank – they are more interested in dollars in my account not my feedburner stats!).
If you are trying to kick start a new blog – or an old one which has the classic 10 readers, one of which is your mother – think about what you are offering your readers: if you aren’t offering them something then that could be part of the problem. This is why focusing on a niche for a blog is easier – if you start writing about the joys of being a first-time step dad and then continue onto to home renovation – your original audience may fall by the wayside. Which is not to say that you can’t have several topics going at the same time – but starting with one and expanding it will be easier – not just to bring your audience with you but also for the search engines to rank your posts because they have already ranked you for related terms.
Which is not to say you can’t change topics and introduce new things. For example when I started getting a significant number of readers here a lot of us knew each other from online forums – most of my readers knew more about keyword search than I did. But recently I seem to have acquired some new readers who may have missed some of these basics – so hence this post. Some of my regulars will have dropped off by now – but they should be off doing some work anyways- those that are still awake may have learned something.
So What’s a Buying Keyword?
Canon SX20 IS SuperZoom Camera
I thought this was magic for a while too. A buying keyword is also known as commercial intent. Sometimes we search to buy stuff – sometimes we don’t. Consider these search terms which I just made up:
When I typed in the query about fish recipes – I got the recipe for the kedgeree that I was looking for – there were ads on the page but Iwasn’t interested – recipes are great things to find online but don’t expect to start a recipe site and make money – you visitors want the recipe – you’ve answered the need – end of story. I site about cooking techniques would possibly do better
Passive income – its kinda in between – people are looking for information – they may want to do something with that information – they may become regular readers or subscribers (in the way the fish recipe person probably won’t) – but they don’t have a huge urge to act now.
The Canon SX20 IS is my latest oh so cool gadget – its a top-ranked megazoom camera with a 20X optical zoom and a 12MB maximum file size and does cool video too – I love it! Now I bought it recently and I was aware of how to search online but basically I started with a search along the lines of “wide angle, 20x zoom, AA batteries” and came down to narrowing it down to this one and another I searched on the very specific model number to understand the pluses and minuses of that particular model. Its an expensive camera I wanted to be sure. I spent 5 minutes going to a local shop and holding it in my hand – I spent hours finding all the reviews for it. It should have been a buying keyword for someone – unfortunately I don’t live in the US and the cheapest place I could buy it doesn’t have an affiliate program – and that’s one of the reason that usually US traffic will convert better (Amazon won’t ship the camera to New Zealand (or Australia) and that’s very common for electronics). Not all search traffic is equal – luckily you are unlikely to get serious numbers of visitors to your camera review site so don’t worry about it too much!
Generally as you get closer to spending money the longer the keyword you type in “Florida vacations” could be a school assignment on American domestic travel or a bored office worker dreaming at their desk, “family Florida vacations” – is someone getting a bit more serious about actually spending some money: “Florida Disney World Vacation hotels” – is getting better – but “Florida Disney World Vacation hotels coupons” could be a very good buying keyword indeed (it may or may not be – its not mine, its just my opinion, your mileage may vary etc etc).
Oh and engage brain about buying keywords before you use a tool – if someone is looking for a free WordPress theme – do you really want them on a blog you are trying to sell paid WordPress themes from?
So find specific keywords for your niche – sure start with the Adwords tool for brainstorming – but look at what is being pushed on TV and newspapers as well.
Optimizing Images
You’ll notice that cool camera pic is named for the name and model and has a similar caption and alt-text. Google can’t “read” images – it reads the name of the image, the alt tag and the caption …
Double Indexing in Google and Retrofitting Keywords
Now this is a bit of confession – not every post here is written with a keyword in mind – in fact in the early days – none of them were. Even these days I will sometimes just post cause I want to share with my readers and can’t be arsed with the search traffic.
But there is a secret to old posts – and I don’t do this often enough – the edit key. This is the trick to getting a double listing. Obviously ranking on the first page for a keyword is nice – but getting double listing is even better: one that looks like this:
The trick is this – each post has a link within the text of the post which links to the other one with the anchor text “third tribe review”. I usually work it something like . In the second post I will say that as a follow up to my recent post on (and I ad the link) <long tail keyword phrase here> blah blah. Then I edit the first post and often at the end of the post I will add a sentence or so that that says – read my follow up of <long tail keyword phrase> here.
FAQs About Keywords
Does capitalisation matter? It may to the grammar police – but not to the search engines – the key word lis sowerbutts is exactly the same as Lis Sowerbutts – how do I know – try the two searches and compare the results – you will find they are the same.
Is the plural version of a keyword the same as the singular? No its not – but they are very closely related. Rank yourself for “blue widget” then getting the ranking for “blue widgets” will be much easier.
Does punctuation matter? To EzineArticles definitely, Google – no. Whether you link to “blue widgets” or blue widget’s” or even “blue widgets’ ” its all the same to Google – they are all the same keyword phrase. Same goes for punctuation – whether you link to: ” Products are available in red or blue. Widget and doodas are available ..” Or “blue widget” the keyword is the same keyword.
On Page SEO
That is the book as far as I am concerned about on-page SEO. The short version of how to write for your readers is something like:
write descriptive titles (headlines);
I link to relevant posts on the same topic in the text of the post;
use subheadings if it fits in – use your keyword in them if reads naturally;
include useful information in the post about the topic – this means I will naturally use terms related to my my main keyword;
If I am writing for search engines I do:
all of the above
I try to include my keyword in the first 60 characters so its automatically in the post’s excerpt which is shown in the search engines;
more words is better than less – the reason that this post is so long is hat the main keyword is quite competitive – the more I write the more likely I am to hit some obscure phrase that someone may search on…
if I am using WordPress -add relevant tags to each post and make sure the blog is set up to index the tag pages
if the whole blog is about a specific keyword I include that in the title and sometimes the tagline
My point is that none of the stuff I do for the search engines to find my keywords – has any affect on my readers, if you are in a non-make money online, non-SEO niche they won’t even notice.
This really is all you need to know about what you should be writing on your site as far as long tail keyword research is concerned. If you want to seriously increase you traffic then spend a bit more time find long tail keywords you can easily rank for and less time pushing out more and more content which is unlikely to really engage your readers or show up in the search engine results.
Of course the on-page SEO stuff I have been talking about here is the 20% – the other 80% of your effort should all be about Back Links – but that’s another post and fortunately Allyn’s already written the definitive post about how to get backlinks check it out !
I’m a fan of WordPress – this blog actually started off on blogger a very long time a go – but I go so frustrated with their technical limitations I moved Passive Income over to self-hosted WordPress and never looked back. WordPress is free and of course there are approximately a zillion free WordPress themes around but I have now spent money on three different options for paid wordpress themes – given that I don’t like spending money – you might well ask why?
Two reasons really – support and re-saleability (is that a word ?). I’ll explain. I had this particular blog on a free theme but the down side with WordPress is that it gets updated regularly – way too regularly sometimes. Its settled down recently but at one stage they were realising updates every week or so. These updates are usually to fix security holes so you ignore them at you peril. The problem that arises of course is that the update sometimes breaks the theme, or maybe its the updated plugins you are using are broken – anyway you can spend many unhappy hours trying to fix the support. And with free themes you get the support you deserve – none – no problem with that, I don’t expect the theme developer to work for free. For many of my sites have no support isn’t really a problem – but on sites such as this one it can be.
Why I Bought Thesis Theme
So I looked long and hard to find something that would work for this site. My requirements weren’t outrageous or terribly unusual and went something like this – I wanted a
SEO friendly theme – or would at leasst work with All-In-One-SEO plugin;
theme which is supported and updated – it is the new version of Thesis was out the same day as WordPress 2.8 was released – impressive – they have active and helpful support forums;
theme which I wouldn’t have to re-do my customisations on if I had to upgrade WordPress and/or Thesis – Thesis uses a smart approach to ensure you don’t inadvertantly over-write your customisations;
customisable theme so it looked like me – but it didn’t actually require any design skills because I don’t have any;
theme that could display and nest comments in a readable fashion because I have quite a lot of them;
a theme that let me control the top level navigation
a 3 column theme with both columns on the right of the content
theme to plaster the affiliate ads in the usual place – top right, above the fold
Thesis makes for a pretty good boring niche theme out of the box – but you have to work out whether the cost of a developer’s licence is worth it for you.
Why I Don’t Like Thesis Theme
Thesis allowed me to do all these things. It fulfilled my wish list. But I don’t like it. I know that’s pretty much hearsay because Thesis, is tied up with the A-list crowd and if you Google “thesis theme review” you will find lots and lots of happy people – who are generally running Thesis on their blogs. And a lot of them have pretty nice designs as well all based on Thesis – and all, I strongly suspect customised by a professional designer who is fluent in CSS and knows how to make stuff look good. I am neither – but thanks to Thesis I am now much more conversant in CSS – now that is not a bad thing – but it was not exactly why I paid $87 for a premium paid theme. What I don’t like about Thesis:
It has not one but two Thesis Options panels – this is confusing – I am always going to the wrong one – even after months.
I had to use code to add a header image – seriously – I joke not. Now if you don’t want to do anything else most peoole want their own header – and its not a matter of just added the file to the right place in the control panel : instead I have endless options over text styles, fonts, spacing of various elements blah, blah – all I wanted was a pretty header and a background that matched <pout>;
Using images is painful – I have to import an image and then cut and paste and add the thumbnail image code so that I can have the combination of having a picture anywhere I want in the picture plus having the thumbnail appear on other pages such as categories – its a nuisance.
Thesis is expensive if you want to deploy it. If you want to run it on more than one site you need that developers editions – that’s another $77 over the initial $87 for a single user. Plus if you want to sell a customised theme to a client that’s another $15 per a client theme.
Thesis makes a big deal of being SEO friendly – but its SEO settings are no more difficult to use than the free all-in-one-seo plugin – it replaces that plugin – but most people would already be running all-in-one anyways;
if you are a designer Thesis really is a framework and you can no doubt do beautiful things -but its a bit like giving me a top-quality blank canvas and a paint brush and tell me go create – I am a rather more paint by numbers gal! You maybe able to do beautiful things with Thesis – or afford someone who can – I can’t do either;
the ability to display ads using the “multimedia” box is fine and the ability to control this down to post level is impressive. What’s not is the place you put the code shows at most 2 lines of a narrow column- you have to use a text editor to actually edit and update the code – this is because most of the screen space has been used on the unecessary design elements;
their affiliate banners are really. really ugly – yellow is the only option – and this is in the marketplace where people care about design.
I may or may not stay with Thesis – the box below the post content converts well – and I haven’t seen that in another theme – yet. I did however decided that it was just too hard to customise for me to produce unique designs for websites I might sell.
Summary:
Cost: $87 – one site or $154 unlimited sites
Affiliate progaram: 33% commission 60 day cookie Is now managed by ShareaSale – I haven’t looked into the details
Why I Bought Elegant Themes
So I wanted to start a new flagship site – the site needed to look a bit more professional that this one and I was even going to tone down that language and have a front “landing page”. To deploy Thesis Theme on the new site was going to cost another $77 – I hesitated. I noticed a few people using and recommending elegant themes and I looked harder. In fact I headed over to their site and spent days drooling over the prettiest themes I’d seen for a very, very long time. Now most premium themes appear to cost from $70 up – these themes (and there are 26 of them at the time of writing ) cost $19.95, total, not each. In the end I decided I had wasted more than $20 drooling at the shop window and I bought.
Now short of taking off a week or two just to review themes from elegant themes I am just addressing the one theme from their selection that I have deployed – eBusiness – you can see it running live at Legimate Online Business. By the way the newer themes come with options eBusiness has three completely different looks each in three colour ways- so you actually get more than 26 themes.
Now the guy who creates the themes at Elegant Themes isn’t an expert on SEO – but he’s managed to get most things right with eBusiness – I’ve set the them to use a static front page with the lastest blog posts showing. The front page is acutally of a combination of up to four WordPress pages – each page title becomes a H2 header on the front page. Meanwhile the blog side of things is controlled by making sure each blog post has a category of “blog” – this I thought was a bit clunky – but it actually works quite well – it means that if I link back to http://netmarketingtoday.com/category/blog in say comments, plugins like commentluv can easily parse the latest blog post.
Now Elegant Themes don’t claim to be SEO optimized but eBusiness works just fine with all-in-one-seo, postname permalinks all the rest of the stuff you should be doing anyways. What I particularly liked about Elegant Thems is:
good support, active forum and, more usefully, very detailed step-by-step videos for the tricky bits: thumbnails and Hostagor (see below);
there are enough options for me to customise the theme without expecting me to actually make a design decision more complex than enable/disable ;
eBusiness allowed me to have a static front page but still direct readers to the updating blog;
only a few content areas are controlled directly from the theme that is the slider at the top of the front page (not sliding at the moment as I only have one slide- can be up to three) and the “about me” photo and box at the top of the blog posts – everthing else is controlled by standard WordPress widgets which include an (optional) sidebar on posts and pages (can differ) and an (optional) footer;
they have some really interesting specialist themes for those who have art galleries or want to show off videos – I am seriously considering putting up my holiday snaps so I can play around with ePhoto! There are some slick magazine/news themes too but I am a bit over those myself.
What’s not to like about eBusiness:
out of the box the theme had links in the text only a very subtlly different colour from regular text – I made them blue so people would know to click;
this is not elegant themes fault but there is slight issue you have to deal with if you are on Hostgator and want the thumbnail images to appear. I had the problem and worked through the documentation and fixed it – but I will have to repeat for other websites I deploy their themes on (the issue is with a common plugin for managing thumbnails so is theme independent);
you cannot resell or distribute their themes legally – if you sell a site that is using the theme the new owner has to buy a membership too.
Its worth pointing out that the $19.95 is actually an annual subscription – when you pay with paypal the subscription is automatically created. You are not obliged to continue with the subscritpion to use the themes but if you cancel you lose access to the forum and future theme releases – you would want to download all the themes before you cancel and used all the support documentation that you require.
Summary:
Cost: $19.95 unlimited access to 26 33 themes (and more appear to be released every few months) for use on an unlimited number of YOUR sites
Affiliate program: 50% commission.
For both of the above themes you no one can offer a money-back guarantee – you need to put the cash up and commit before you get access to a premium themes so thing about what you are trying to achieve before you sign-up.
Free Themes for Niche Sites
I should say too that I often use simple, SEO friendly themes for my niche sites – they are pretty boring looking at that is pretty much the point. Free themes I like and use include:
Grizzly Sniper – looks just like an ugly blogger blog but its WordPress!
Adventure Tour – not as ugly as some but you can easily customise the header!
Boring Memo – and leaving the most boring of all hard to believe a designer developed this LOL
If you want something in between you might also want to check out Frank’s new site: Templates for Websites for some very cheap options (like $7 cheap!)
I have yet another solution for websites I will setup to sell – but that may have to wait for another post – this one got a little loooong !